
What I've learned so far
The tools I use to build panoramas are all free software, nearly all open source. They will give top quality panoramas if used correctly and sensibly. But they require some knowledge and experience to be used properly. I'm working with MS Windows XP and the Panorama Tools.
- Panorama Tools by Helmut Dersch seem to be still the best tools for the core processes of the panorama building workflow. Actually, it's a function library used by other (frontend) programs. The latest and best version should be downloaded from SourceForge and put into the Windows system directory. An unrestricted version (field-of-view > 160°) is offered by Jim Watters.
- All around this Panorama Tools kernel is found on SourceForge, too. Useful are the plugins for Photoshop or the free alternative, the Gimp. They are suited to undistort and resize any images, preserving image quality. To this end, select the Sinc256 or even the Sinc1024 (if available) interpolation method in the parameter settings.
- For each step in the panorama building workflow there is a specialized tool. All these tools are called from the Windows (or whatever) command line, requiring some parameters and/or a parameter file. Though therefore the whole process could run as an automatic batch job, in most cases some manual intervention is needed for top quality. That's why frontend programs are used, and hugin seems to be the best free GUI for Panorama Tools. You get it from SourceForge, too. (Hugin was one of the two ravens of the ancient single-eyed god Odin, seeing and understanding for him. So, Hugin stands for thinking.)
- In the panorama workflow, the first step is to specify the individual pictures that should give the panorama and to identify several characteristic points (Control Points) in the overlapping areas. The standard tool doing that automatically is Autopano by A. Jenny. Autopano is called from within hugin. So you'd specify the panorama pictures in hugin and then call Autopano by clicking a button 'Create Ctrl Points'. But I think that another tool does an even better job, it's Autopano-SIFT by S. Nowozin. You get it directly from his website. Don't fail to look at his tutorial, too!
-
hugin claims to be able to call Autopano-SIFT also, letting you set the path
to the program and some parameters in the preferences dialog box. But the
default settings didn't work, and I managed to get it work only by entering
the path to the program and the parameters by hand. There's a command script
named win-autopano-sift-cmdline.vbs that has to be invoked instead of the
program directly. Don't use the " ... " button, hugin may crash. Instead,
enter the path where you installed the program by hand, e.g.:
C:\Program Files\Autopano-SIFT-2.3\win-autopano-sift-cmdline.vbs
The arguments should be: -o %o -p %p %i
For fisheye lenses or spherical mirrors, RANSAC filtering must be off, so add -n to the Arguments. There is a bug in the script "win-autopano-sift-cmdline.vbs". Open it in WordPad, search for "filespec" and replace that by "KeyFileName". - Obviously, Autopano-SIFT won't give full control of all parameters this way. So it might be better to start the workflow with the special Autopano-SIFT GUI called autopano-win32.exe. You will specify the individual images, set some parameters (checkmarks), and let the program find several control points, later used to stitch the images together. The image and control point data are written to a project (.pto) file. Take a look at the tutorial especially for the GUI.
- The project file is opened in hugin, which in turn opens all images and reads control point information. You may select an image and let hugin read the EXIF data, or you may enter some data about the lens used. hugin uses these data as hints for image undistortion, what is it's main duty. The program is a GUI to check all control points, correct wrong points, set new ones and add vertical and horizontal line definition points. Finally, the Optimizer - part of Panorama Tools - is called to calculate all image turn, twist and distortion.
- Last step is creating the panorama. In any case it should be stored in TIF format, but you may choose a single file or multiple files. You will supposedly want to do the latter since it lets you apply Enblend to the panorama. The actual panorama creation is done by a stitcher program. It bends each image so that all images can be overlayed giving the whole panorama. Unfortunately, at their edges all pictures are different in brightness and color. An enblender program will provide a gradual transition.
- The PTStitcher program is a key component of Panorama Tools. But it was offered only closed source, by default replaced by the open source nona stitcher program in hugin. nona is good and fast, but PTStitcher still has some advantages. It's able to compensate brightness and color between images and to blur the seams with a feather tool. All that is done in one single step minimizing quality losses in the image. But there's a better method than a feather tool implemented in Enblend.
- You will want to use it for it's superior quality regarding the seams. hugin should be able to call it automatically if the nona stitcher is used (check 'Soft Blending'), but obviously that doesn't work. So you have to call Enblend yourself, either with a GUI front end or directly from command line. The front end is not really useful, and you should better use a command script. It should contain one single command line call with some parameters and all image filenames used for the panorama. The images are TIF files generated by the stitcher program. You may use nona or PTStitcher as well. The latter might be better since it is able to correct brightness and color making Enblend's job easier. But deactivate the feather tool by setting 'feather width' to zero since Enblend doesn't like it's own job taken away completely.
- You have to generate the panorama in a format suitable for a viewer. The Apple Quicktime VR viewer e.g. uses a special cubic projection. You'll need a special program for that. PTViewer, on the other hand, expects the image in a spherical projection, as an 'equirectangular' panorama. (Seems the Reflex XTR model flight simulator, too.) Choose the appropriate projection method in hugin. You may also choose a final image size, but in most cases you will have to process (e.g. crop) the panorama image in Photoshop or Gimp, anyway.
- You'll need a special panorama viewer locally (on your computer) and in Web pages. There is the fine Java applet PTViewer by Helmut Dersch or by by Fulvio Senore. The former is the original in the latest version and with some new features, the latter a developement forked from an earlier version but with a different (better?) interpolator. Try yourself and check the PTViewer Documentation for information how to write HTML code for the viewer. Pannellum by Matthew Petroff is an excellent, ready-made panorama viewer for Web pages.
Some experiences using panorama tools:
- You should calibrate your computer monitor, at least adjust brightness and contrast. Go to Clarkvision.com and use the greyscale test strip on the bottom of the page. There's comprehensive information on calibration here. Good help for calibration and adjustment was at tom's hardware guide (no longer available). There's comprehensive information on calibration also here, but id doesn't work for me / my TFT monitor (don't know why so far).
- Autopano-SIFT is good in finding control points evenly distributed over the whole overlapping area and only at greater distance from the camera. It's image aligning ability is best exploitet with both filtrations and letting it 'Generate horizon line' during 'Automatic pre-aligning of image'. It's not necessary to 'Enable refinement step', though.
- Sometimes stitching errors occur due to parallax errors, i.e. failing to turn the camera around it's nodal point. Even that might be corrected by setting many control points in the area where the stitching error occurs. Set control points on both sides of the visible (wrong) seam. If hugin finds the right counterparts ('auto estimate' checked) the error should be removed.
- Setting points for vertical and horizontal lines is a valuable help for the optimizer. Alas, there are few horizontal lines in most pictures. At least declare as many vertical lines as possible. But be careful choosing vertical lines in pictures. Not every pale is really vertical in reality...
- The optimizer does a decent job finding even lens distortions. If there are enough suitable control points, no lens data (from EXIF or entered manually) are needed at all. Instead, they are calculated by the optimizer and stored in the project file. Conversely, if you have correct lens distortion data you won't need any control points to only undistort a single picture.
- In the best case, all individual pictures fit into a seamless panorama doing all optimizations in one step. In the worst case, they don't fit at all and are stitched in a completely inappropriate manner. In that case you will appreciate hugins panorama preview function. Set additional control points at suitable places and optimize stepwise, the simplest optimizations first. Observe the hints in the Hugin Overview and in Rob Park's tutorial.
- Some programs, as Enblend, seem to have problems to correctly deal with zenith and nadir. You have to correct any image flaws in Photoshop or Gimp, but in most cases you resize and crop the panorama image anyway so it should be only a minor additional step in the workflow. But it can be painful as well.
- Obviously PTViewer and Reflex XTR use different definitions of viewing angle or field of view. In Reflex, I prefer a 90 degrees "Camera aperture angle". In PTViewer, the same impression is achieved with a 45 degrees field-of-view parameter (<param name="fov" value="45" />).
-
For an own panorama, the position of the sun in Reflex XTR may be adjusted.
Load the panorama in Gimp and set the mouse cursor to the point you consider
to be the sun center (not as easy as it might sound). Read the X (horizontal
from left) and Y (vertical from top) pixel coordinates from the status bar.
Now calculate:
azimuth = X / 8160px * 360° (this has to be checked for correctness)
elevation = ( 2040px - Y ) / 2040px * 90°
Do a Google search for WLPEdit, download the program, read the instructions and run it for your replacement scenery. Enter the calculated angles and save. - An own panorama should resemble a native Reflex panorama at least for runways and terrain level. Though you have to choose a suitable camera viewpoint to have the same view of the runway, it's easy to adjust the horizontal alignment later. Obviously, in Reflex the left edge of the panorama image is zero azimuth. By comparison with the Reflex panorama you might locate the position where the model is placed initially. Then the corresponding place in your own panorama should be at the same azimuth position, counted in pixels or degrees. Shifting is done in Gimp with Layer -> Transform -> Offset..., setting X the shift pixel count and "Wrap around". To adjust the sun position, just add the equivalent to X in degrees, that's X / 8160px * 360°. (this has to be checked for correctness)
What yet has to be done
Some thoughts:
- It seems most panoramas are shot with wide-angle lenses or even fisheyes. Few pictures are needed and the shooting lasts only a short time, avoiding problems due to moving clouds and changing light. But some panorama authors recommend lenses of 'normal' focal length for better panorama quality. Main argument is the better 'perspective' obtained by greater focal length. I'm still strongly convinced that perspective is determined by point-of-view only, not by focal length. It's only a question of image quality whether you use a greater focal length. Wide-angles show noticeable distortions and aberrations, vignetting and other errors especially on the edges. On the other hand, a 'normal' focal length (50mm for 35mm film) not only gives superb image quality but also makes the optimizer's job very easy.
- So if you're striving for an automated generation of high-quality panoramas using Panorama Tools, rather go for greater focal length and more pictures. Consider building a panorama robot to accelerate the shooting of the many pictures you'll need. Using a 50mm lens (35mm film equivalent) in portrait orientation, you'd need 140 pictures for a full spherical panorama. The 7 rows and 20 columns would give 33% horizontal overlap and 31% vertical. This amount of overlap enables Autopano's task finding suitable control points to be done. The camera has to be fast (not only if you use a shooting robot), but low resolution would be by far sufficient (e.g. 1 MPix). Maybe an early (low resolution) high-end (image quality) DSLR (speed) would fit, and it might be affordable as a used item.
- Shorter focal length is no tragedy, though. A moderate 35mm wideangle lens can not at all be so bad that Panorama Tools would fail to automatically generate a panorama. I tried even the zoom lens of a pocket camera (Canon IXUS 400) without any problems. So far I only made single-picture-row panoramas, but they worked well. If there are problems in the pictures (e.g. parallax errors), it's easier to solve them manually since there are few pictures (13 in one row). The 4 MPix resolution results in panorama images about 16000 pixels wide, what's enough for any practical purpose.
- In his panorama how-to, Horst Lenkeit describes his procedure to build panoramas for the Reflex XTR model flight simulator. (It's all in German, but you will at least understand the many screenshots.) He uses a common digital camera set to 35mm (equivalent) focal length. The simulator requires a 360x135° panorama image, so a 4 MPix camera will give about twice the resolution needed (8160x3060 pixel). Horst shoots 4 rows of 12 images each in portrait orientation (1704x2272 pixel). The 48 images are processed following virtually the same workflow as described above and without noticeable problems. The results are fine.
- Even ultra-wide-angle lenses should be no problem if some conditions are met. Especially the usual barrel distortion should be simple and not complex. In this case, the optimizer will automatically correct the distortion. There should be not much vignetting, or you have to enhance the images by masking before the panorama building process. A good 20mm lens will require only 18 pictures for a full spherical panorama, two rows of 8 pictures and one for both zenith and nadir. Some manual work should be possible for this low number. The problem is that at least a 7 MPix camera is needed to get the same resolution as in the above example. But a 4 MPix camera would still be sufficient.
- Of course, three 180° fisheye pictures give even less panorama pixels / resolution than the 18 ultra-wide-angle pictures (20mm focal length), not to mention the 60 wide-angle pictures (35mm focal length). Three pictures is minimum for full spherical panoramas. Now not only very expensive fisheye lenses and high-resolution cameras are suitable, but also low-cost cameras and self-made mirror-ball optics. (There's a nice tutorial in the PanoTools wiki.) Often, high image quality isn't absolutely needed, as for web panoramas or simulator sceneries seen only in motion. Or one simply trades quality for low cost. In any case, Panorama Tools have no problem to correct any regular distortion caused by any optical system used.
- The 'perspective' isn't correct in a panorama picture, anyway. Straight lines are bent, and only the viewer program renders the lines straightly again, giving the right perspective. Additionally, you have to adjust a suitable viewing angle (field of view, FOV) to get the 'right' or at least a pleasant perspective. A big FOV lets the panorama look like a wide-angle picture, a small FOV lets it look more 'naturally' ('as if you were there'). PTViewer e.g. uses a 40° default horizontal field-of-view, corresponding to the usual 'normal' 50mm focal length (35mm film equivalent). I prefer an even smaller 32° HFOV, corresponding to 70mm focal length, as I prefer an 85mm lens for general photography. As Ken Rockwell says, "it's just the way I usually see the world".
Intentions (if I only had time...):
- Since I rarely shoot photos and panoramas I don't want to invest much. Unfortunately, I'm demanding for quality. There are two solutions for this problem. I could loan some good equipment and try to find out what best suits my needs. Or I could use what I already have. That's quite a lot.
- An old Nikon FM SLR camera body with a quite good and fast 20mm Nikkor Ai lens is able to give sharp even if complexly distorted pictures. This all-manual system is just good for panorama shooting, since you may meter exposure all around and then decide for a fixed exposure setting and manual focus. A 36 picture film will hold exactly two panorama picture sets or allow to shoot twice with different exposures. A Fujichrome Velvia 100 (ASA) slide film together with the f/3.5 lens speed requires longer exposure time, but we're using a tripod anyway. The lens is even better than the film, which will give 10 to 16 MPix resolution (see ClarkVision.com) and pleasant colors. My Nikon CoolScan III (LS 30) film scanner has 2700 dpi resolution, resulting in about 9 MPix out of 24x36mm images. Of course, shooting and scanning must be done carefully to achieve full quality, but the equipment (including the SilverFast scanning software) makes that possible. And there's some reserve since 'only' 7 MPix are needed according to the estimate above.
- A simple full-sphere panorama tripod head should be built, using only cheap materials. The simplest-is-best approach should be applied also when robotizing the panorama head. It could be tested with the film camera if I'd buy a used motor or winder. Finally, the panorama robot should be useable with any camera, at least with common DSLRs. It's a demanding design task.
-
It would be interesting to try the mirror ball trick.
How to get rid of the Photographer
MAKING A PANORAMA WITH A SPHERICAL MIRROR
SHOOTING VR WITH A ONE-SHOT RIG
QTVR and Panoramic Images
Create a panorama with Panotools
Panorama making rehearsal (... I made some time for it)
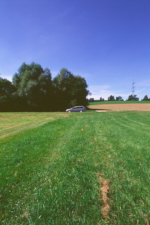
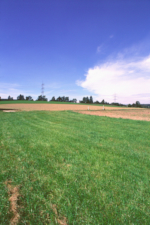
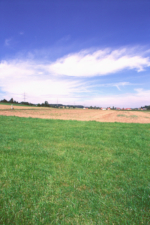
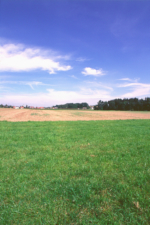
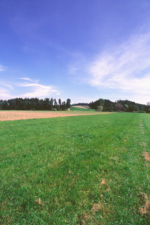
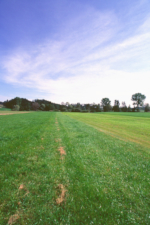
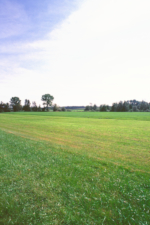
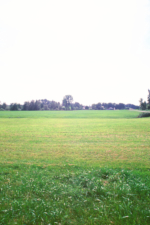
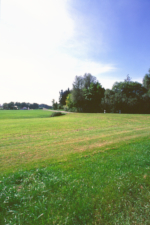
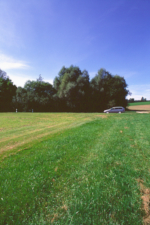
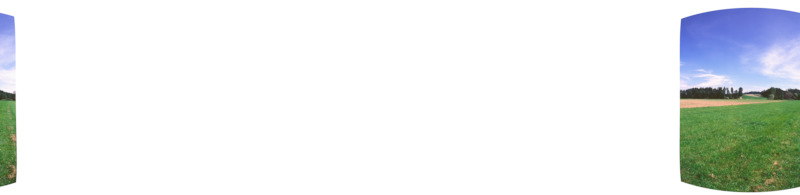
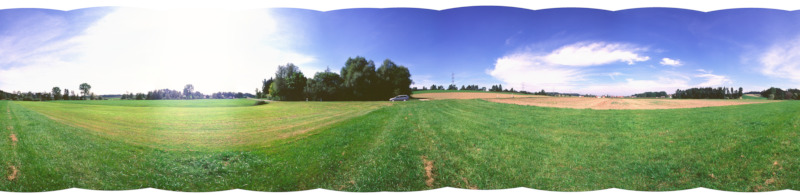
For the most part, the procedure described in the previous sections (including shooting on film and scanning) has been applied to my (now former) model flying place, which is a meadow in a beautiful landscape.
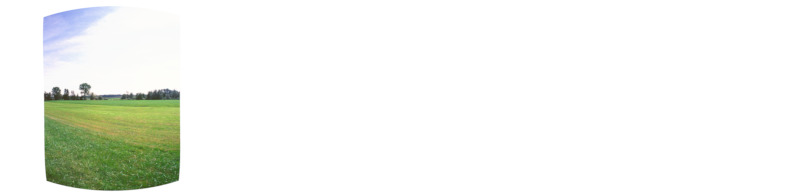
There was even a (loaned) tripod with a panorama head (both by Manfrotto) and the camera was pivoted on its nodal point. But for simplicity's sake only 10 pictures have been manually shot in vertical format and in exact horizontal direction. The 20mm ultrawide lens gave plenty of overlap horizontally (37%) and so much viewing angle vertically (83°) that the missing sky and ground are rarely noticed and can be filled by cloning in a graphics editor. The 10 frames were scanned from the slide film:
All pictures should be equally exposed. The lens's aperture was set to f/11 (sharpest) and its focus for maximum depth-of-field (with its scale) what made the panorama sharp (as sharp as possible) from foreground to background. The center-weighted exposure meter was rotated through 360° to find an exposure time suited for most of the panorama. For the slide film, rather underexposure was chosen when in doubt. Unfortunately, the picture shot with the hazed sun in it (lower middle above) got too bright. Perhaps it was the clear filter (I had forgotten to remove from the lens) or the lens itself (lacking a hood) what made for this flare. However, I was not able to help it afterwards (with a graphics editor).
For scanning, again a common exposure for all 10 frames had to be found by trying. If there would have been film underexposure it could have been corrected now. Suitable settings for dust removal (ICE) and sharpening had to be found by experiment, that is a compromise of both. Color rendition and contrast can be influenced in the scanning process so convenient settings had to be found by trying as well. Finally all 10 frames have been scanned with fixed settings, at native scanner resolution, and in 16 passes each to reduce noise. Including the prior trials, that were almost 200 scanning passes, albeit most of them were unattended (the 16 consecutive passes per frame anyway and, with the help of an automatic film strip advance, multiple frames as well).
The scanner produced 4.2 megapixel (MP) pictures, less than half of what I had thought. Part of that is due to clipping the edges a bit, but it seems the 2700 dpi native scanner resolution is about halved when generating the 24-bit RGB pixels in the picture files. Now there's no reserve but just the opposite, too few pixels, at least as measured by the 7 MP estimate above. But it has also been mentioned there that 4 MP would be enough. That turns out to be true now since each of the 10 scanned pictures being 1685 pixels wide means more than twice as many pixels as needed for the 8160 pixels wide panorama, or more than full overlap. Yet that makes doubling the panorama resolution (for other simulators) impossible. I call that a scanner-resolution bottleneck because that's what limits panorama resolution with ultra-wideangle shots on film. The Velvia 100 slide film's resolution turned out to be clearly higher than scanner resolution. Anyway, the scanned picture files' lossless-compression TIF format was retained throughout the following process.
It started with specifying the 10 pictures with their respective azimuths, which were exactly known from the the panorama head's scale, and their common 0° elevation. Then Autopano-SIFT found several control points already, but the generated project file had to be opened in hugin to specify lens correction data already known and then correct some control points, add quite a few new ones and as many vertical lines as possible. Several cycles were needed with hugin generating a tentative panorama, in which control points were corrected and added, whereupon the next tentative panorama was generated with more optimizations enabled. Especially the sky and grass areas were virtually impossible to stitch automatically.
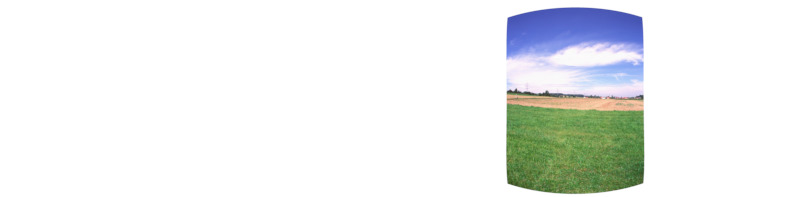
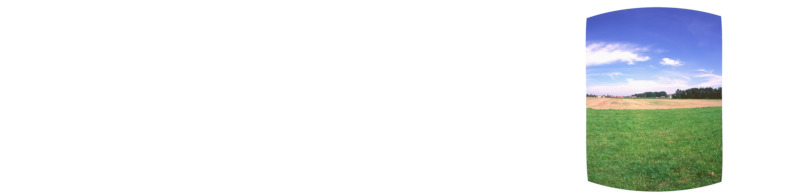
Yet all stitching errors could be removed eventually by setting appropriate control points manually even if after a lot of trying. (Some stitching errors are hard to spot and correct, and the 20mm lens has complex distortion.) Now the Stitcher program could create the final panorama. In this case, brightness and color correction was not needed or not advisable, respectively. But the panorama was created as multiple files to let the separate Enblend program compose the complete panorama picture. The 10 picture files already have the resolution and distortion needed for the spherical panorama, so they can be enblended simply pixel-wise. They are even placed in the final rectangular picture frame and hence show the overlap used in the final stitching:


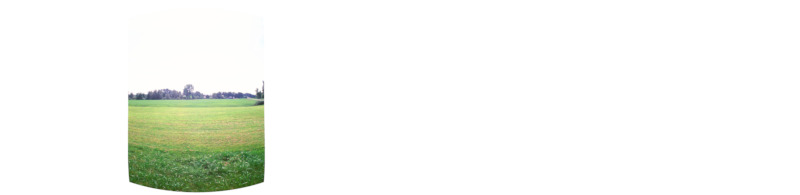


The single pictures just stitched together show slightly different brightness and color on the seams. The picture with the hazed sun in it (third from left) stands out for its flare:
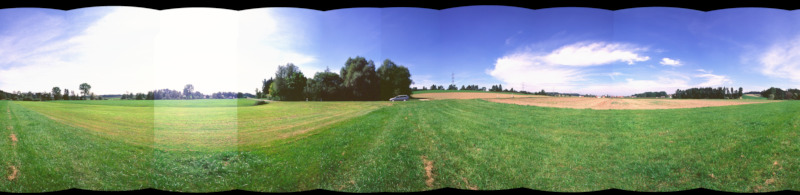
With brightness and color enblending enabled during the stitching, the seams become virtually invisible. Yet the flare is visible in the part where the sun is; there's just a smooth transition now. The horizon line is (vertically) in the middle of the picture but the terrain is sloping upwards all around so the visible horizon is more or less higher.
For some reason, the simulator needed the panorama picture shifted horizontally by a certain number of pixels. The wavy upper and lower edges just have been clipped. Both has been done in the GIMP pixel graphics editor. The resulting picture file (4.8 MB) in simulator resolution (8160 pixels wide) may be inspected in a panorama viewer which shows the panorama picture's quality (sharpness, colors, JPEG artifacts in the sky). Click on this preview picture:

For the simulator, blue sky has been added on top up to the zenith and the grass has been cloned downwards, but not completely down to the nadir because the REFLEX XTR² simulator puts a compass dial there. The full 8160x4080 px wraparound panorama picture (360° horizontal and 180° vertical) with the lower 1020 px just black is available for download here (5.3 MB).
Conclusions for later panorama making
The process making use of a film camera and a scanner worked – the panorama picture came out reasonably well. It was a lot of work but a lot of fun as well. Yet I won't do it again. It's just too tedious to scan all those frames from film. The scanner-resolution bottleneck (with consumer scanners and ultrawide lenses) vanishes with longer focal lengths but that would require scanning even far more frames (with 16 passes each).
The quite modern Nikon D600 full-frame 24 MP digital camera I own now, together with the old but excellent Nikkor 28mm f/2.8 AI-s prime lens I own now, would give far better resolution – virtually without lens distortion – and save scanning entirely. The lens's focus would be set (with its scale) for a depth-of-field from infinity to a few meters at f/5.6 aperture (sharpest regarding diffraction) and then its aperture to f/11 for maximum overall sharpness in the depth-of-field. It would be still sharp at closer range considering eye height is 1.7 m already. With the manual-aperture lens, the camera would have to be in aperture-priority mode, anyway, but should be set to manual mode once a suitable exposure time has been found (and ISO should be set to manual and lowest value even before).
Picture size could be set to Medium (13.6 MP) or even Small (6 MP). The latter would result in still better resolution than the scanned pictures have (4.2 MP) and avoid the blurring effect of Bayer interpolation. The sharpening and dust-removal problems of scanning are avoided altogether so the pictures will come out really "crisp". Finally, 19% more resolution (of the camera compared to the scanner) and a 26% narrower field-of-view (of the 28mm lens compared to the 20mm) mean about 44 pixels per degree of field-of-view (compared to 28 px/°) available for the panorama picture, which has 23 px/° in the end. It would hence look just better (sharper, crisper) and its resolution could be doubled still – in a pinch.
The D600 could be even used with the 20mm lens and picture size set to Large – resolution (65 px/°) and image quality would be yet better than with scanned film, but the complex lens distortion would be still there. A full wraparound panorama picture requires at least 16 shots with a 20mm lens and at least 30 shots with a 28mm lens. (My spreadsheet for the calculation with minimum overlap is available for download here.) Considering that no film advance is needed with a digital camera, 30 shots seems even easier than 16 shots with a film camera. There may be just more work needed to help the stitcher find the correct overlap by manually defining common points and vertical lines. Absence of lens distortion would reduce this need, though.
So virtually all aspects add up to preferring a full-blown digital camera
and a distortion-free lens.
(This résumé being written in 2023 – long after the
fact in 2005 – when digital shooting is long taken for granted.)
The process using free software tools worked as well – finally all stitching errors were ironed out. Being able to do it with free software was satisfying but doing it once is enough. It's just too tedious to work around software bugs, use different front-end software and command scripts, and add a lot of control points manually.
Commercial panorama software is complete, all functions are used in one single graphical user interface (GUI), it's (nearly) bug-free, and it works much faster. It just costs some money. But when I bought the used lens I payed more than PTGui Standard cost, and when I bought the used digital camera I payed even more than PTGui Pro cost. Seems I have sort of a cheapskate bias towards hardware and should buy the software as well in case I do another panorama.
So for serious panorama jobs, using commercial software is advisable.
(This résumé also being written in 2023 – while PTGui
existed even before 2005 – when PTGui is in widespread use.)